

How To Make A Star Makeup
Forget Halloween: You'll Want to Habiliment This Star Eye Every Day of the Year
Oct xiv, 2020
-

Facebook
-

Pinterest
-

Twitter
-

Copy
From meteor eyeliner to lighting bolt eyeshadow , we love taking makeup inspo from the dark sky. So when nosotros spotted a gradient star-shaped eye await on Heather Moorehouse , we knew we had to add the shiny, angelic design to our list of looks to recreate. To assistance us break information technology down step-by-pace, we tapped makeup creative person Jonet Williamson , who put her own smoky spin on the shimmery star. While the expect is so cool you could technically call it a Halloween costume , nosotros want to article of clothing it every damn 24-hour interval. From perfecting the points to applying the glitter, follow this tutorial and your eyes will be twinkling in no time.
-
STEP i:
Trace the Starting time Half
Don't become straight in with eyeshadow. When it comes to creating a star, it's best to take things slow and create a guide. "Utilize the NYX Professional Makeup Slim Eye Pencil in White to trace five points around your eyes," says Williamson. "The easiest mode to practice this is to await straight alee, into the mirror, and start by placing the peak betoken at the center of your eye, just below your brow." From there, draw a triangle where the diagonals stop above your crease. "Then, draw a line direct across from one side to the other to serve as the acme line of the star." To finish off the upper half of the star, depict diagonal lines inward. They should end at the upper lash line and create the second and third points of the star.

-
Step two:
Outline the Bottom Half
The top three points will remain on your lid, simply the bottom two points will be drawn on the lesser part of the eye where concealer would unremarkably be placed. "From the lower lash line, draw outwards on an bending — the contrary of the direction you used on meridian," says Williamson. Ane line will stem from the outer corner and the other will start only to the side of the tear duct. To finish the outline, connect the lines at a point just beneath the middle of the lower lash line.

-
STEP iii:
Shade the Top
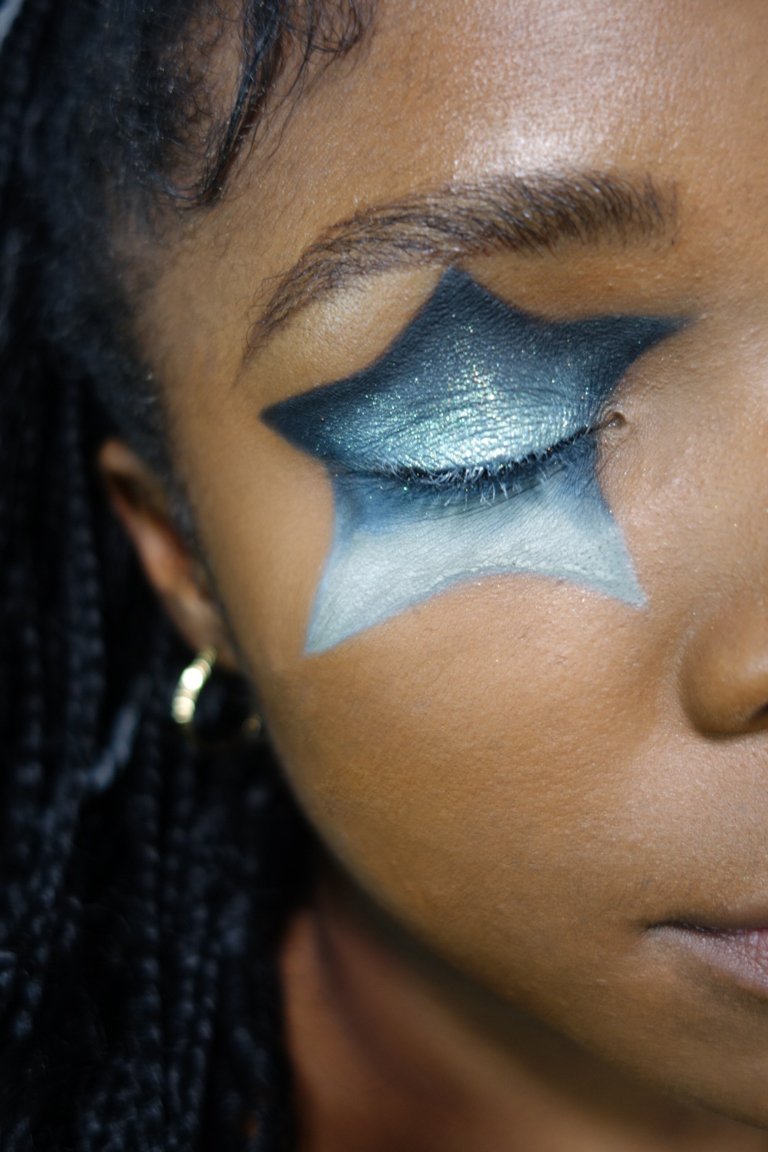
Next, Williamson used the Urban Disuse Eyeshadow Primer Potion in shade Freebase, a white matte, to color in the tiptop half of the star. "In one case the eye is primed, take a business firm shadow brush or shader brush, grab a dark shade, like the black in the fourth row of the NYX Professional Makeup Ultimate Utopia Palette , and put it just by the crease," she says. "And then for your second color, catch a matte shadow that's around 2 shades lighter to act as transition tone and a backdrop for your shimmery shades." Here, Williamson used the smoky blueish at the end of the third row of the aforementioned palette. This color will be placed from the top lash line and upwardly to the pucker, blending in with the darker color.

-
Pace 4:
Shade the Bottom in a Gradient
Now that the top half is colored in, prime the bottom half of the star with the Primer Potion to disguise any fallout and prep for shadow. "Forth the edges at the showtime of the bottom one-half, shade in the darkest color so it looks like the color is flowing through," says Williamson. "Next, grab a shade two shades lighter than the center color and fill in the residue of the star." For the lightest shade, we recommend using the pale blueish shade in the second row of the NYX Professional Makeup Ultimate Utopia Palette . You can also use the shade Opal Aura from the Urban Decay Stoned Vibes Palette .

-
STEP 5:
Add Glitter
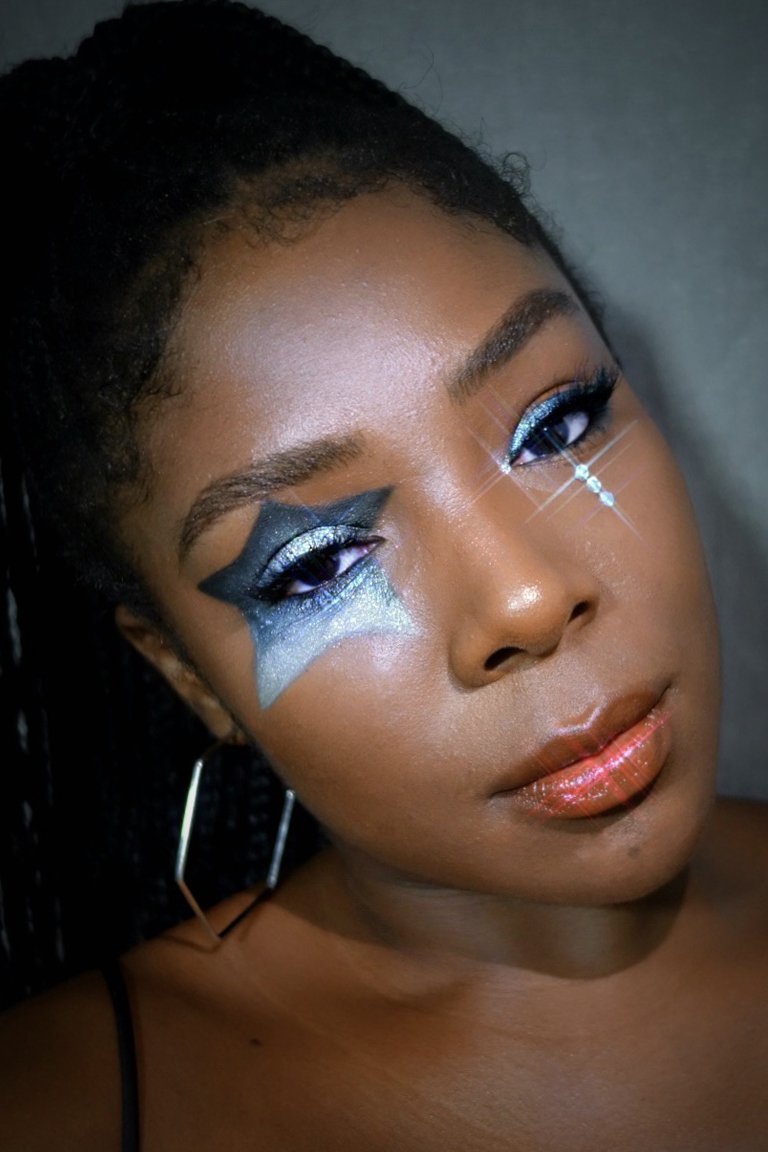
To add together a shiny glimmer to the wait, information technology's key to add some glitter, similar the Bodyography Glitter Pigments . "Moisture a fluffy castor and dab glitter onto unlike places in the heart area throughout the star," says Williamson. "On the top, pack it on from the upper lash line going up into the crease, and on the lesser portion bring it from the lower lash line all the way to the lesser tips."

-
Pace six:
Apply Finishing Touches
While y'all can definitely go out the expect as is, Williamson decided to step things upwards a notch by adding a gradient wing on the other center using the aforementioned eyeshadow shades. She and so added three rhinestones below the lower lash line, swiped on some mascara and was good to go!

Photography and Makeup: Jonet Williamson
Read more than
Source: https://www.makeup.com/makeup-tutorials/eyes/star-shaped-eyeshadow-tutorial
Posted by: ingallsforbeartne.blogspot.com
0 Response to "How To Make A Star Makeup"
Post a Comment